
Drywall installation is one of the most common tasks in home construction and renovation, forming the foundation of smooth, paint-ready walls and ceilings. Whether you’re finishing a basement, remodeling a room, building an addition, or repairing damaged sections, learning how to cut drywall correctly is essential for achieving clean lines and professional-quality results.
Poor cutting techniques often result in wasted materials, uneven seams, visible gaps around outlets or windows, cracked edges, and panels that do not sit flush against studs. These mistakes not only affect the final appearance but can also increase finishing time, require additional joint compound, and raise overall project costs. In some cases, inaccurate cuts may even compromise structural alignment or insulation performance.
Beyond appearance, proper cutting improves installation efficiency. Clean, accurate cuts make fastening easier, reduce strain during fitting, and allow tape and mud to bond more effectively. Precision also minimizes dust production and reduces the risk of accidental breakage during handling.
| Step / Tool | Purpose | Best Practices | Common Mistakes to Avoid |
| Utility Knife | Score the drywall for clean snapping | Use sharp blades, one firm pass, slight angle | Dull blade, multiple shallow cuts |
| T-Square / Drywall Square | Ensure straight lines | Hold firmly against the edge, use for long cuts | Misalignment, wobbly marking |
| Tape Measure & Pencil | Accurate measurements | Measure twice, mark clearly, and account for outlets | Incorrect measurements, skipping double-check |
| Keyhole / Jab Saw | Cut openings for fixtures | Steady, controlled cutting | Rough or uneven cuts, forcing the saw |
| Drywall Rasp | Smooth edges after cutting | Light sanding, clean edges for seams | Skipping edge smoothing, uneven finish |
| Chalk Line | Long straight cuts | Snap line for accuracy | Misplaced line, uneven scoring |
| Dust Control Tools (Vacuum / Drop Cloths) | Minimize dust spread | Seal doors, clean tools frequently | Ignoring dust control, poor ventilation |
| Power Tools (Rotary / Oscillating) | Complex or large cuts | Use for specialty drywall or intricate shapes | Not wearing protective gear, excessive dust |
Understanding Drywall Basics
Before learning how to cut drywall properly, it’s important to understand what drywall is and how it behaves. Drywall panels are made of a gypsum core sandwiched between paper layers. The material is sturdy yet brittle, which means improper handling can cause cracking or crumbling.
Common Types of Drywall
- Standard whiteboard (general interior use)
- Moisture-resistant (green board)
- Fire-resistant (Type X)
- Mold-resistant panels
- Soundproof drywall
Each type may require slightly different handling, but the cutting principles remain the same.
How to Cut Drywall? Essential Tools
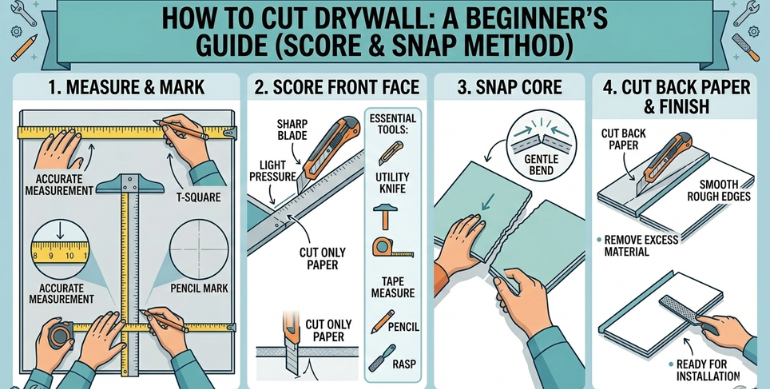
Using the right tools significantly improves both accuracy and efficiency when working with drywall. Basic cutting tools include a utility knife with sharp blades for scoring clean lines, a T-square or drywall square to ensure straight and precise cuts, a tape measure for accurate sizing, and a pencil or chalk line for clear markings.
For interior openings such as electrical boxes or fixtures, a keyhole saw or jab saw is commonly used to create controlled cutouts. In addition to these essentials, advanced or specialized tools can make certain tasks easier and more precise. A drywall rotary cutter is ideal for fast, detailed openings, while an oscillating multi-tool provides smooth, controlled cuts in tight or complex areas.
A circle cutter is useful for creating perfectly round openings for recessed lights or vents, and a drywall rasp helps smooth rough edges after cutting. Regardless of the tool used, blades should always be sharp, as dull blades tend to tear the paper rather than produce clean, professional cuts.
Step-by-Step Guide: How to Cut Drywall Properly
1. Measure Accurately
Accurate measurement prevents costly mistakes and unnecessary material waste. Measure the installation area carefully and double-check all dimensions before marking the panel. Be sure to account for electrical outlets, switches, vents, and other fixtures that require openings. Clearly mark all measurements using a pencil so the cut lines remain visible and precise.
2. Mark the Cut Line
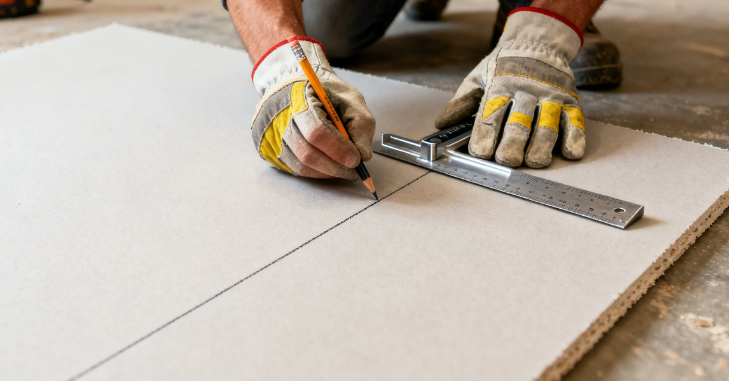
Use a T-square to draw a straight line across the drywall panel. Hold the square firmly against the edge to maintain proper alignment and prevent shifting while marking. Clear, straight marking ensures accurate scoring and helps avoid uneven or jagged edges during the cutting process.
3. Score the Surface
Place a straightedge along the marked line, then use a utility knife to score through the paper layer on the front of the drywall. Apply steady pressure and aim for one firm, controlled pass rather than several shallow cuts. Keep the blade angled slightly for better control and cleaner results. It is important to note that you do not need to cut all the way through the board; scoring the surface paper and slightly into the gypsum core is sufficient.
4. Snap the Panel
Once the surface has been scored, lift the drywall panel and gently bend it backward along the cut line. The gypsum core will snap cleanly along the scored section. This snapping method is the key technique that makes drywall cutting both fast and efficient.
5. Cut the Back Paper
After snapping the panel, use the utility knife to cut through the paper backing on the opposite side. This final cut separates the two pieces and creates a clean break along the line.
6. Smooth the Edges
To finish, use a drywall rasp to smooth any rough or uneven edges. This step ensures the panel fits properly against adjoining sheets and creates a clean surface ready for installation and finishing.
Cutting Drywall for Outlets and Fixtures

Straight cuts are simple, but outlet openings require more care.
Method for Cutting Around Electrical Boxes
- Measure the box position precisely
- Transfer measurements to the drywall sheet
- Mark the top, bottom, and side boundaries
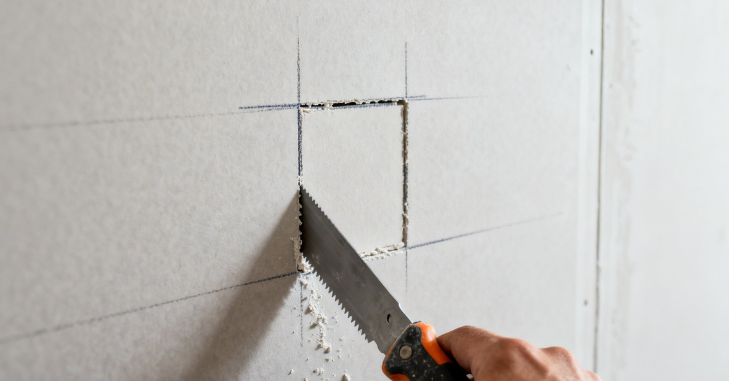
- Use a keyhole saw or rotary tool to cut the opening
Accuracy here prevents gaps and misalignment.
Drywall Cutting Tools and Their Best Uses
| Tool | Best For | Skill Level | Precision Level |
| Utility Knife | Straight cuts | Beginner | High |
| Drywall Saw | Outlet openings | Beginner–Intermediate | Medium |
| Rotary Tool | Complex shapes | Intermediate | High |
| Oscillating Tool | Detailed adjustments | Advanced | Very High |
| Circle Cutter | Round openings | Intermediate | High |
Safety Tips When Cutting Drywall
Understanding how to cut drywall safely protects both your health and your project.
Essential Safety Measures
- Wear safety glasses
- Use a dust mask or respirator
- Wear gloves to prevent cuts
- Work in a ventilated area
- Keep blades sharp to reduce slipping
Drywall dust can irritate lungs and eyes, so protection is critical.
Precision Measurement Techniques
Professional installers rely heavily on measurement accuracy to ensure smooth installation and minimal material waste. Best practices include measuring twice before making any cuts to reduce the risk of costly mistakes, and using a chalk line for long, straight cuts to maintain precision across large panels. Labeling panels before lifting them into place helps prevent confusion during installation, especially in larger projects with multiple sheets.
It is also important to account for 1/8-inch expansion gaps to allow for slight structural movement and proper fitting. Additionally, considering ceiling height variations ensures panels align correctly from floor to ceiling. Even small measurement errors can multiply across large projects, leading to noticeable gaps and increased finishing work.
Common Mistakes to Avoid
Even small errors can cause major problems during installation.
1. Using a Dull Blade
Dull blades tear the surface paper, creating jagged edges.
2. Overcutting
Cutting too deeply weakens the panel and increases the risk of breakage.
3. Incorrect Measurements
Poor measurement results in gaps that require additional joint compound.
4. Forgetting Outlet Clearance
Failure to measure box depth properly can prevent flush installation.
5. Skipping Edge Smoothing
Rough edges create uneven seams and visible finishing flaws. Avoiding these mistakes ensures professional-quality results.
Cutting Drywall for Ceilings
Ceiling panels are heavier and more challenging to handle.
Tips for Ceiling Cuts
- Use drywall lifts when possible
- Pre-mark all cut locations
- Keep panels supported during cutting
- Work with a partner
Ceiling installations require extra care to prevent cracking.
Managing Dust and Cleanup
Drywall dust spreads quickly and can easily travel throughout a workspace if not properly managed. Effective dust control strategies include using a vacuum attachment tool while cutting to capture debris at the source, laying drop cloths to protect floors and furniture, and sealing doorways to prevent dust from spreading into other rooms.
It is also important to clean tools frequently to avoid buildup that can affect performance and create additional mess. Proper dust control not only improves air quality and protects your health but also increases overall project efficiency by reducing cleanup time and maintaining a safer working environment.
Cost-Saving Tips
Knowing how to cut drywall correctly reduces waste and unnecessary expenses.
- Plan the panel layout before cutting
- Use off-cuts for small sections
- Store panels flat
- Avoid overhandling
Efficient planning minimizes material waste.
When to Use Power Tools?

Manual cutting is sufficient for most drywall tasks, providing control and precision for standard panels and straightforward cuts. However, power tools are highly beneficial for large-scale projects, cutting thick or specialty drywall, or creating intricate openings that require detailed shaping.
These tools can save time and effort, especially on complex installations. It is important to note, though, that power tools generate significantly more dust and debris, so extra caution, protective equipment, and proper dust control measures are necessary to ensure safety and maintain a clean workspace.
Professional Tips for Perfect Results
Contractors rely on consistent technique.
- Always score from the finished side.
- Keep your hands steady and firm.
- Avoid rushing
- Test-fit before securing panels
- Practice on scrap pieces
Mastering technique takes patience and repetition.
Final Thoughts
Learning how to cut drywall properly is a foundational skill for both DIY enthusiasts and professional contractors. From measuring and scoring to snapping and smoothing, each step contributes to the final result. Precision, safety, and the right tools are the keys to success.
By avoiding common mistakes and following structured cutting methods, you can achieve smooth seams, clean edges, and a flawless wall surface ready for finishing. With practice and attention to detail, drywall cutting becomes a straightforward and efficient part of any construction or renovation project. If you want to go deeper, read How to Remove Paint from Metal.
Apart from that, if you want to know more about What is Tuckpointing and Why It Matters? Step-by-Step Methods, Benefits, and Cost Considerations for Brickwork then visit our New Construction Homes category.
FAQs
Yes. Wear safety glasses, a dust mask or respirator, and gloves. Dust control measures, such as drop cloths and vacuum attachments, are also recommended.
Measure the opening carefully, transfer the dimensions to the panel, and use a keyhole saw or rotary cutter to make precise cuts. Always check the fit before installing.
Basic tools include a utility knife, T-square, tape measure, pencil, and keyhole or jab saw. Specialized tools like rotary cutters, oscillating tools, and drywall rasps are useful for intricate or advanced cuts.
The easiest method is to score the surface with a utility knife along a straight edge, snap the panel along the score, and then cut the paper backing to separate the pieces.

